Open topic with navigation
Configuring Kiosk - Code Scanning/Pay by Points
Code Scanning can be enabled on the Kiosk so that Customers can scan their loyalty card, enabling them to accrue points as well as redeem their points on any purchase at the Kiosk.
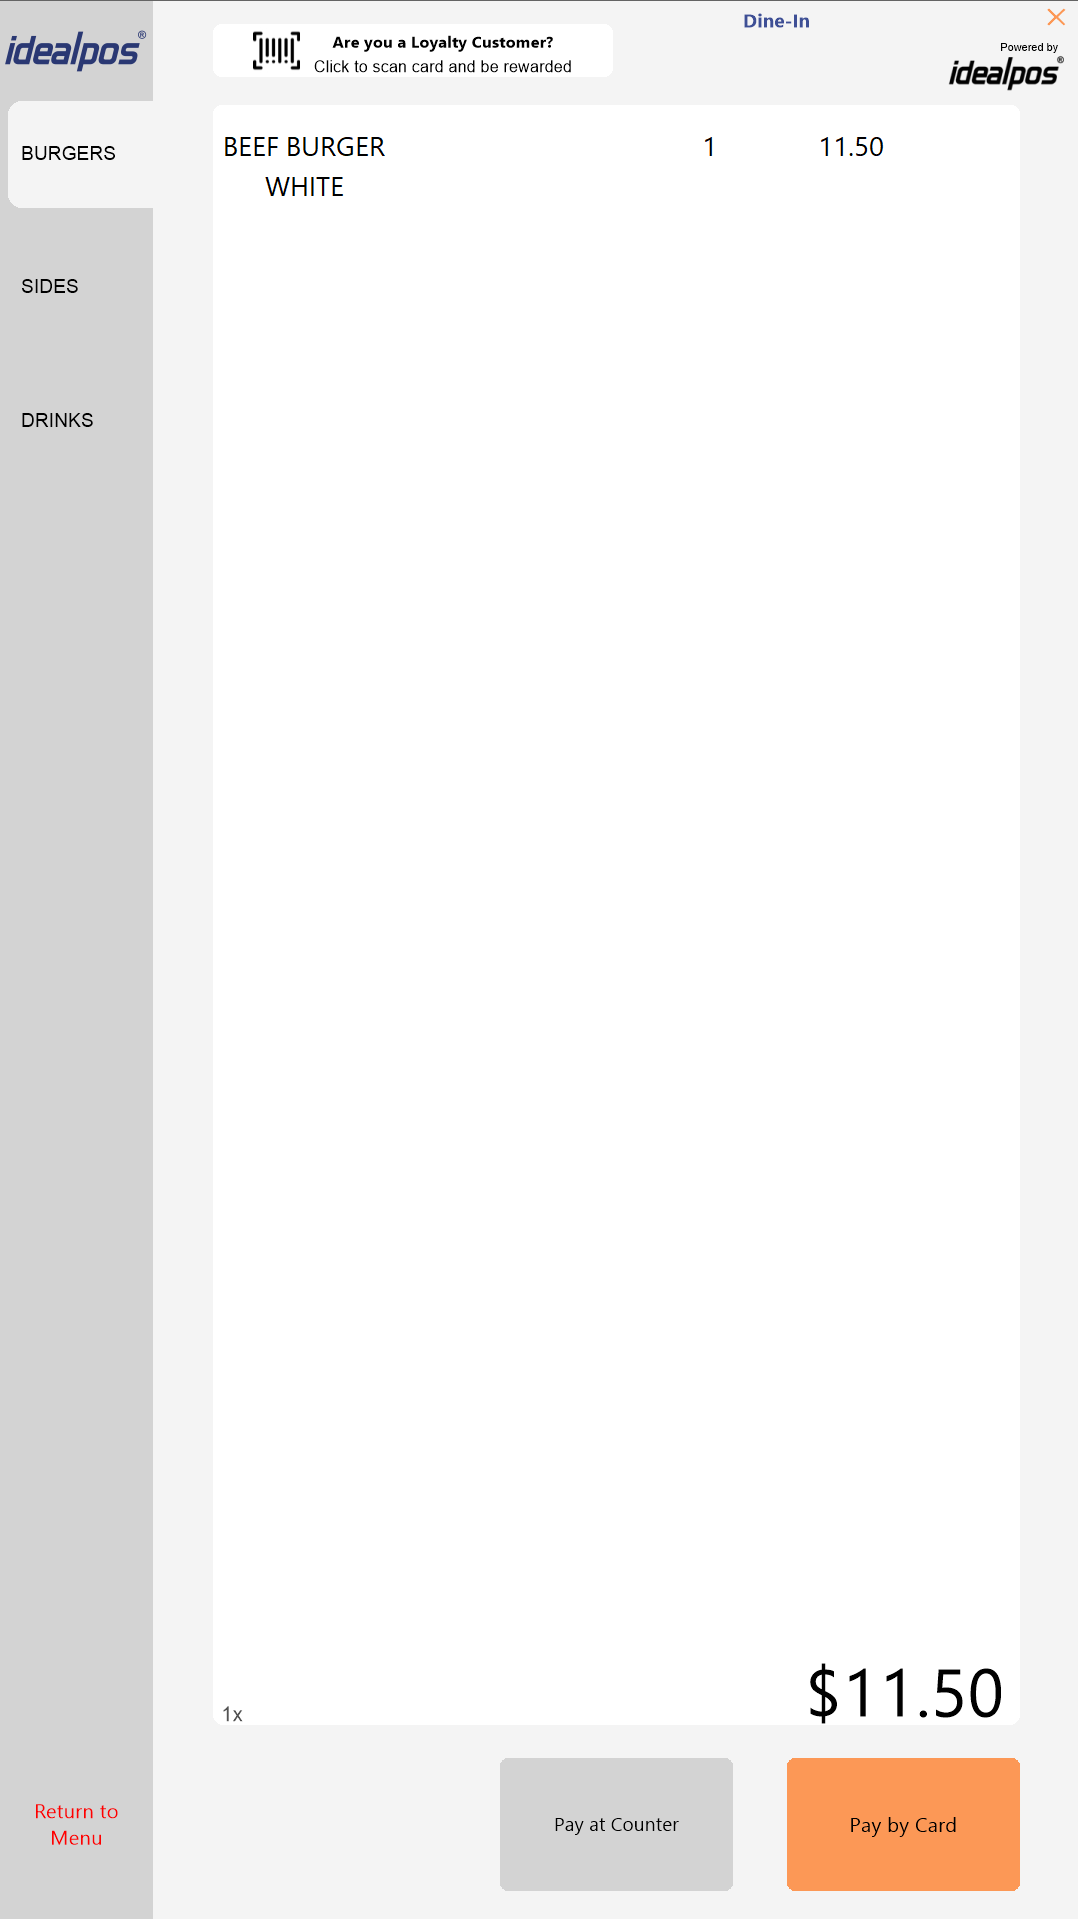
When Code Scanning is enabled, the top of the Kiosk screen will display a button which the customer can press to scan their loyalty card.
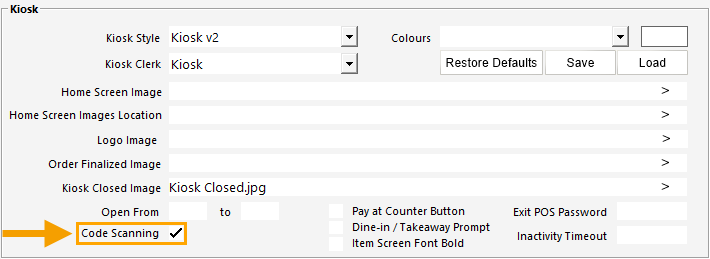
To configure this function, go to: Back Office > Setup > POS Terminals > Select a Kiosk Terminal > Modify > Display/Kiosk tab > Enable Code Scanning.
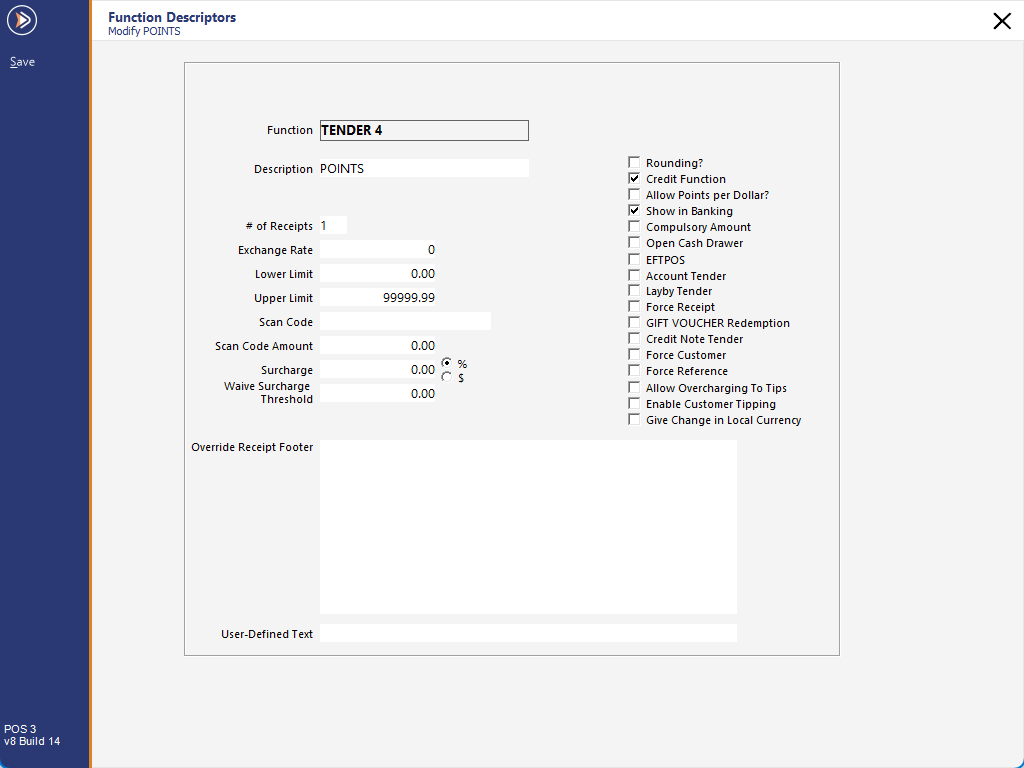
After Code Scanning has been enabled, also ensure that a Points tender has been configured.
Go to: Back Office > Setup > Function Descriptors.
If a POINTS Tender doesn't exist, select the next available unused Tender (unused tenders are typically labelled as TENDER #, where # is the number of the Tender).
Configure the Tender as follows:
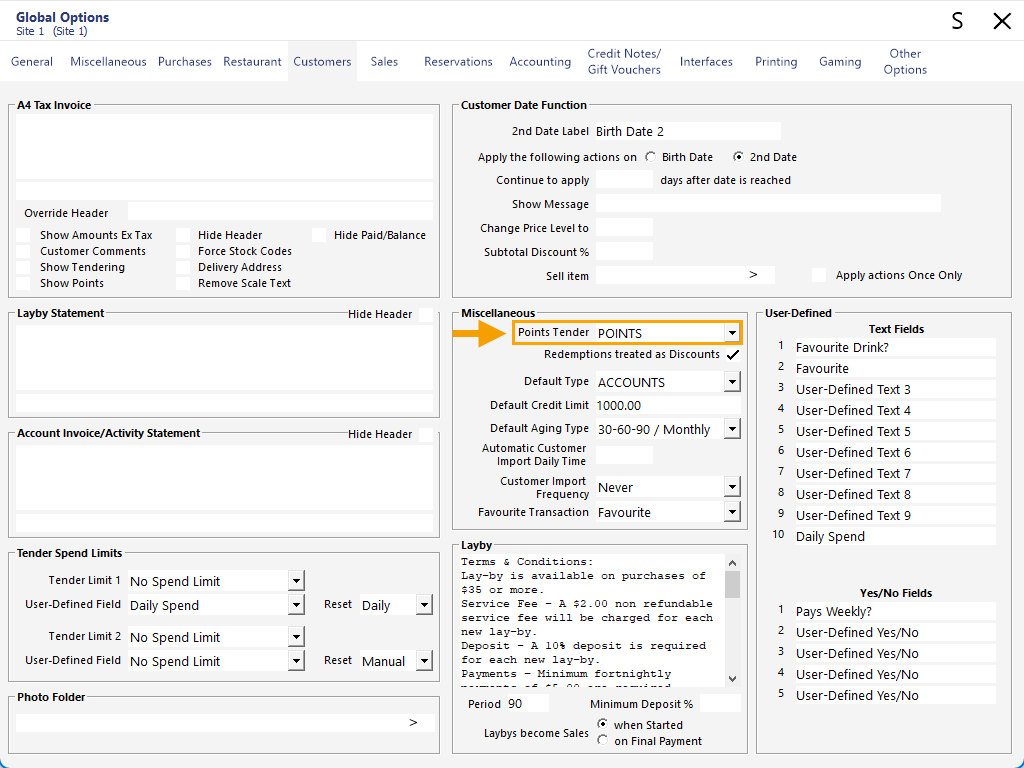
After the POINTS tender has been configured, go to: Back Office > Setup > Global Options > Customers > Miscellaneous > Points Tender > Select the Points tender that was configured in the previous step above.
Note that a Close Suite/Open Suite may be required to update the Points Tender Description shown in the dropdown box.
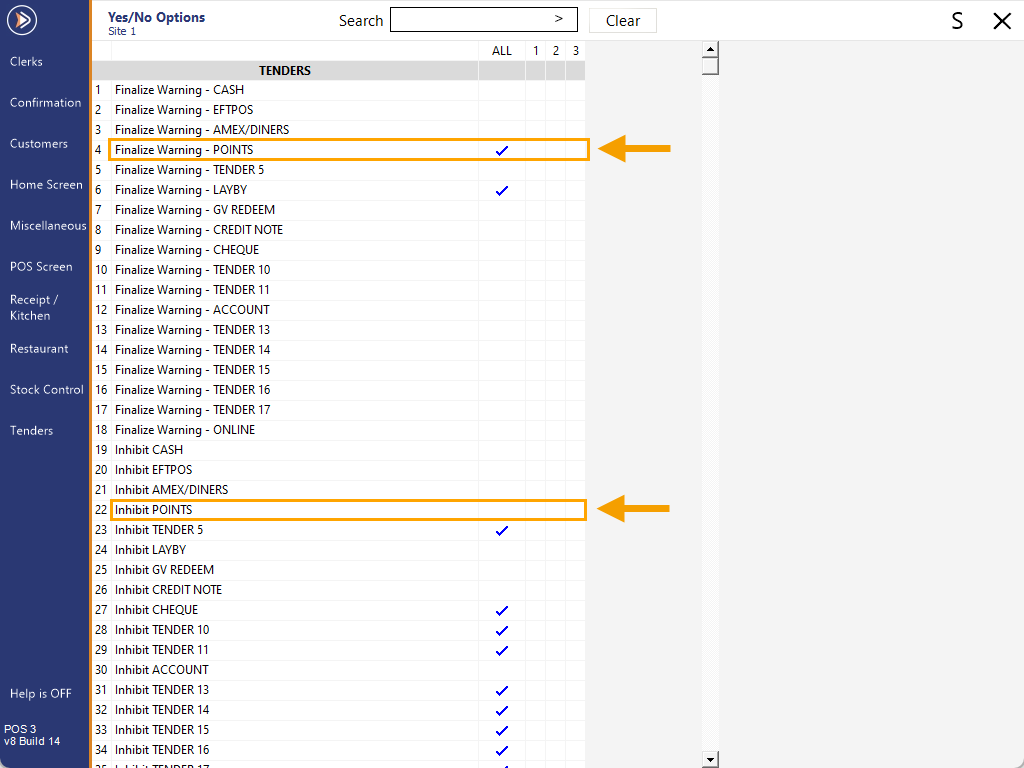
Go to: Back Office > Setup > Yes/No Options > Inhibit POINTS > Unchecked.
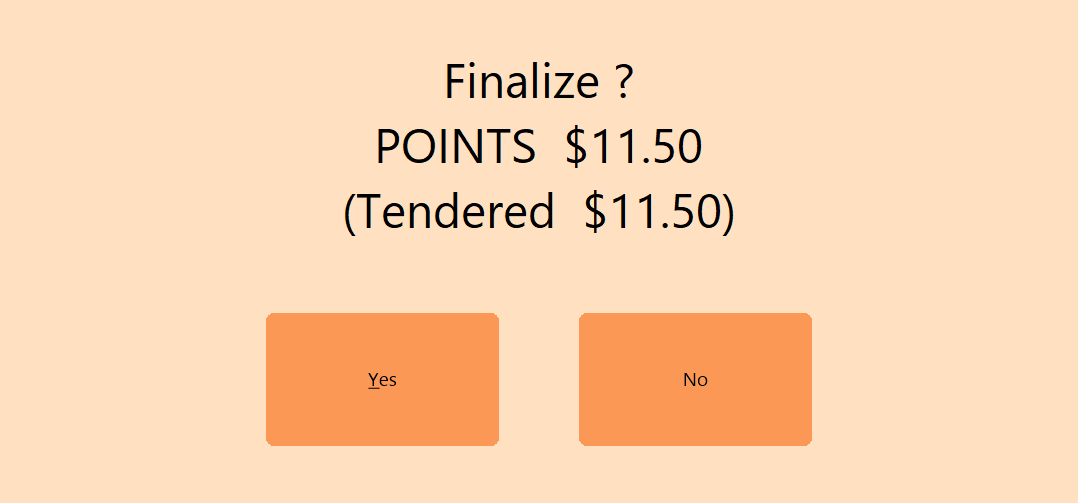
Also, the Finalise Warning can be enabled on the POINTS tender, so that if a Customer presses the Pay by Points button on the Kiosk, they will receive a warning asking them to confirm the point redemption.
Once configured, perform a Close Suite/Open Suite on the Kiosk to ensure that the change has been applied.
After starting the Kiosk, a button will appear at the top of the Kiosk screen that can be used to scan a Customer Loyalty Card.
After pressing the button, the button will prompt the Customer to scan their card.
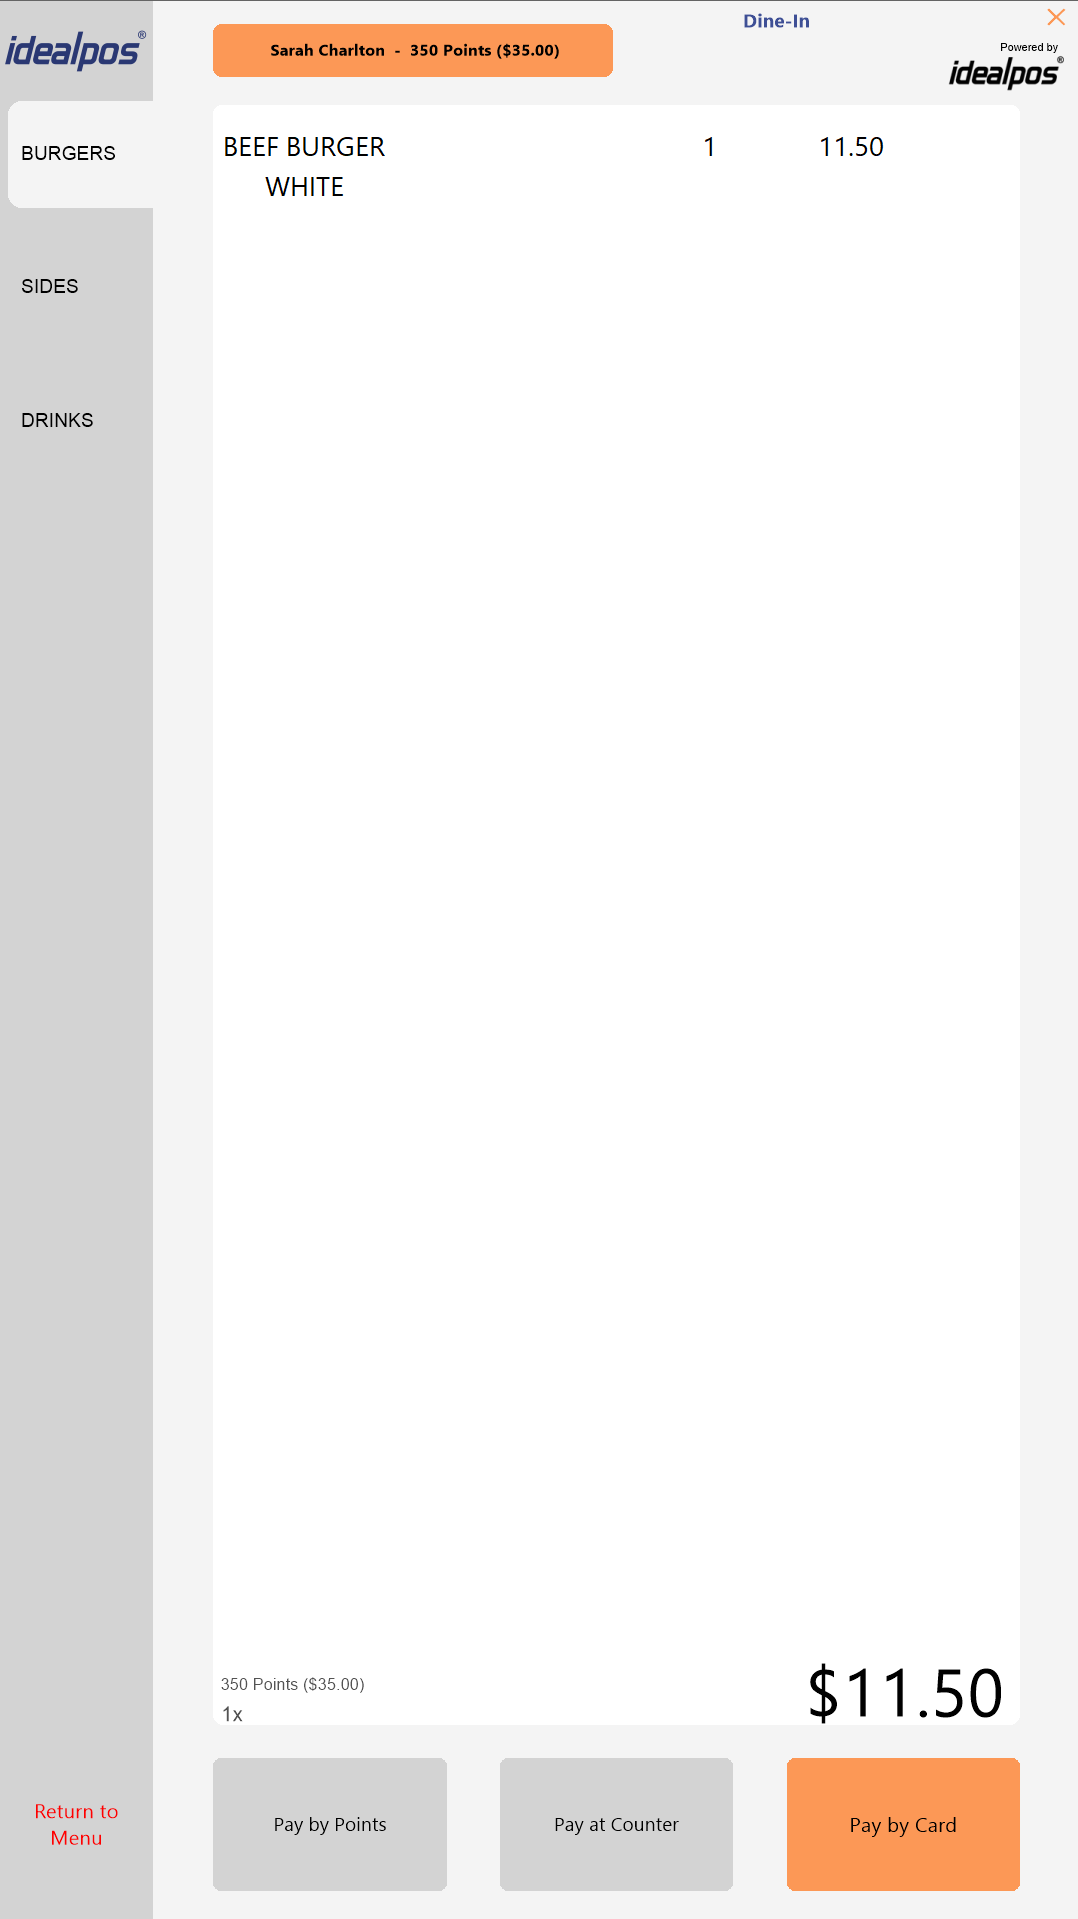
After the card has been scanned, the button will display the Customer's Name and their current Points Balance.
When the customer presses the View Order button at the bottom of the Kiosk screen, the Kiosk will display a "Pay by Points" button on the bottom-left corner of the Kiosk screen.
The "Pay by Points" button will only appear when a Customer has been added to the sale.
If a Customer hasn't been added to the sale, the button will be hidden.
If the Finalise Warning has been enabled for the Points tender, the Customer will see a confirmation prompt when paying for their purchase using the button.
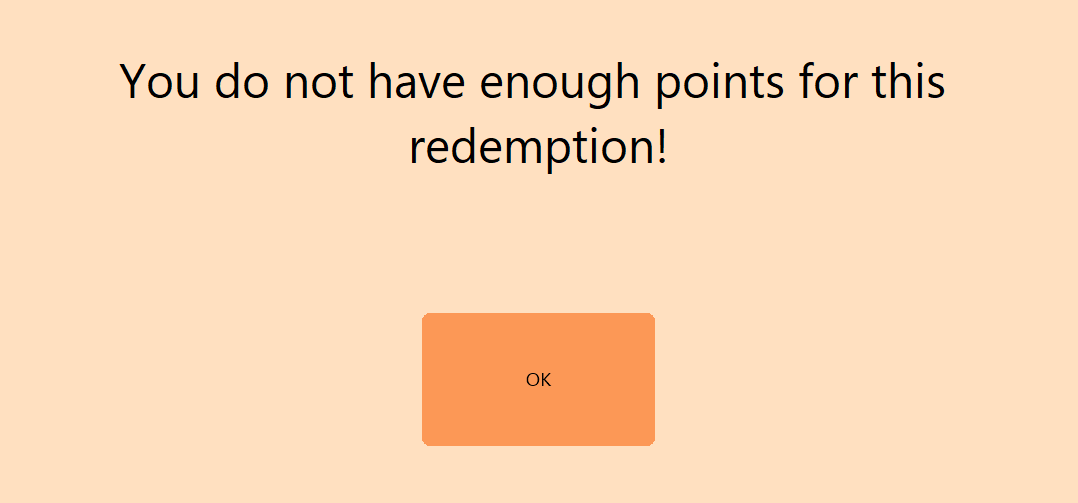
If the Customer has insufficient points, a prompt will be displayed preventing them from finalising the purchase with the Pay by Points button.
Tip!
The Code Scanning box that appears at the top of the Kiosk can be customised as required via User-Defined Options.
To create the User-Defined Options shown below, go to:
Back Office > Setup > POS Terminals > Select the Kiosk Terminal > Modify > POS Settings tab > User-Defined Options.
When creating the User-Defined Options, enter the User-Defined Option into the Description column, and enter the value into the Setting column.
These options may require some trial and error to find the setting that works best for the desired appearance.
Each option shown in uppercase bold is the User-Defined Option that needs to be entered.
The hyphen and the information shown after the User-Defined option is an explanation of what the User-Defined Option does and how to use it.
Note that you only need to create the User-Defined Options that are required.
Also note that a full Close Suite/Open Suite (via IPSUtils) will be required after creating or modifying a value of a User-Defined Option for the change to take effect.
Alternatively, the Kiosk Terminal can be completely restarted which will also enable the User-Defined option(s) to take effect.
The following User-Defined Options enable the customisation of the Code Scanning box:
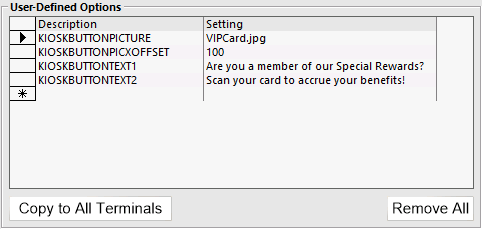
- KIOSKBUTTONPICTURE - This option enables a custom image to be displayed within the Scan Box button. Supported image formats are PNG and JPG. Enter the image name as the User-Defined Setting and ensure that the image exists in the "C:\ProgramData\Idealpos Solutions\Idealpos\Pictures" path on the Kiosk Terminal. Note that the area designated for the image is quite small, so it is recommended that a small image be used (e.g. 50x40 pixels).
- KIOSKBUTTONPICXOFFSET - This option enables the x offset (horizontal) position of the picture button to be customised. Starting from the default position where the image appears, the image can be adjusted to appear further to the left. It cannot be moved to the right from the default image position.
- KIOSKBUTTONTEXT1 - This option enables the first line of text that appears within the button to be customised. Enter the desired text into the Setting column of the User-Defined Option. The default value that is used (when this User-Defined Option does not exist) is "Are you a Loyalty Customer?". Some trial and error may be required to achieve the desired appearance and ensure that the desired message appears correctly on the Kiosk. Also note that the KIOSKBUTTONTEXT1SIZE User-Defined Option can be used to further customise the text size.
- KIOSKBUTTONTEXT1XOFFSET - This option enables the x offset (horizontal) position of the first line of text to be customised. Enter a value into the Setting column of the User-Defined Option. Entering a positive value will move the text to the right or entering a negative value will move the text to the left. This option may require some trial and error to achieve the desired position.
- KIOSKBUTTONTEXT1YOFFSET - This option enables the y offset (vertical) position of the first line of text to be customised. Enter a value into the Setting column of the User-Defined Option. Entering a positive value will move the text down or entering a negative value will move the text up. This option may require some trial and error to achieve the desired position.
- KIOSKBUTTONTEXT1BOLD - This option enables the first line of text to be set as bold. To set as bold, enter a value of 1 into the Setting column of the User-Defined Option. To set as non-bold, enter a value of 0 into the Setting column of the User-Defined Option.
- KIOSKBUTTONTEXT1SIZE - This option enables the text size for the first line of text to be customised. Enter a value into the Setting column of the User-Defined Option. The default value is 12 (when the User-Defined Option does not exist). This option may require some trial and error to achieve the desired size.
- KIOSKBUTTONTEXT2 - This option enables the second line of text that appears within the button to be customised. Enter the desired text into the Setting column of the User-Defined Option. The default value that is used (when this User-Defined Option does not exist) is "Click to scan card and be rewarded". Some trial and error may be required to achieve the desired appearance and ensure that the desired message appears correctly on the Kiosk. Also note that the KIOSKBUTTONTEXT2SIZE User-Defined Option can be used to further customise the text size.
- KIOSKBUTTONTEXT2XOFFSET - This option enables the x offset (horizontal) position of the second line of text to be customised. Enter a value into the Setting column of the User-Defined Option. Entering a positive value will move the text to the right or entering a negative value will move the text to the left. This option may require some trial and error to achieve the desired position.
- KIOSKBUTTONTEXT2YOFFSET - This option enables the y offset (vertical) position of the second line of text to be customised. Enter a value into the Setting column of the User-Defined Option. Entering a positive value will move the text down or entering a negative value will move the text up. This option may require some trial and error to achieve the desired position.
- KIOSKBUTTONTEXT2BOLD - This option enables the second line of text to be set as bold. To set as bold, enter a value of 1 into the Setting column of the User-Defined Option. To set as non-bold, enter a value of 0 into the Setting column of the User-Defined Option.
- KIOSKBUTTONTEXT2SIZE - This option enables the text size for the second line of text to be customised. Enter a value into the Setting column of the User-Defined Option. The default value is 12 (when the User-Defined Option does not exist). This option may require some trial and error to achieve the desired size.
The below is an example showing a few of the above User-Defined Options created in the User-Defined options section (in Back Office > Setup > POS Terminals > Select a Kiosk Terminal > Modify > POS Settings tab > User-Defined Options):
Open topic with navigation